
To change a bike seat, remove the bolt holding the seat in place, lift the old seat off, and replace it with a new one. Are you considering changing the seat on your bike?
Whether you’re looking for a more comfortable option or want to upgrade your bike’s aesthetics, changing the bike seat is a simple process that can be done with a few basic tools. In this guide, we will provide step-by-step instructions on how to change a bike seat.
By following these instructions, you’ll be able to easily remove your old bike seat and replace it with a new one in no time. So, let’s get started and give your bike a fresh and comfortable look!
Credit: road.cc
Remove The Old Bike Seat
Before you can install a new bike seat, you’ll need to remove the old one. This process is quite simple and requires just a few steps. Follow the instructions below to remove your old bike seat:
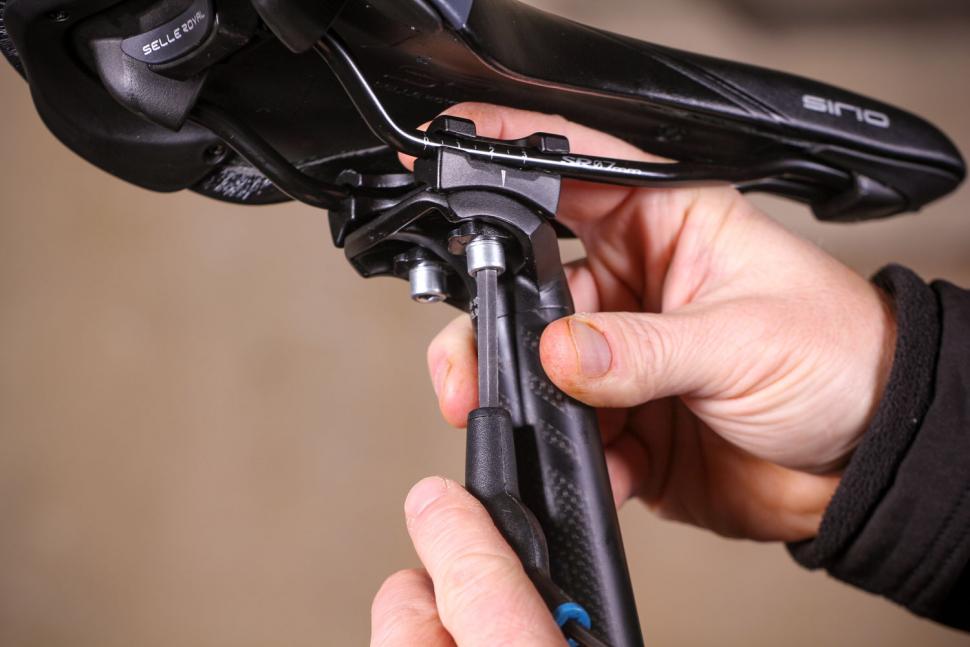
Loosen the seat clamp
The first step in removing the old bike seat is to loosen the seat clamp. This is the mechanism that holds the bike seat in place on the seat post. To loosen the clamp, use an Allen wrench or a similar tool to turn the bolt that secures the clamp. Rotate the bolt counterclockwise to loosen it, allowing you to slide the seat out of the seat post.
Slide the seat out of the seat post
Once the seat clamp is loosened, you can now slide the seat out of the seat post. Grab the front end of the bike seat firmly with one hand and the rear end with the other hand. Gently pull upwards to slide the seat out of the seat post. Ensure that you are pulling the seat straight up and not at an angle, as this could potentially damage the seatpost or the bike seat itself.
If you are having trouble removing the seat, you can try spraying some lubricant around the seat post to loosen it. Give it a few minutes for the lubricant to work its magic before attempting to remove the seat again.
Once the old bike seat is completely removed, you can proceed with installing your new bike seat. To do this, simply reverse the steps outlined above. Position the new seat in the seat post and tighten the seat clamp securely to ensure a safe and comfortable ride.
Remember, changing a bike seat is a relatively straightforward process that can greatly enhance your riding experience. Whether you’re looking for a more comfortable seat or simply want to upgrade to a sleeker design, follow these steps to remove the old seat and get ready to enjoy your new one!
Choose The Right Seat Replacement
When it comes to cycling comfort, your bike seat plays a vital role. Whether you’re a casual rider or a seasoned cyclist, finding the right seat replacement is essential. Consider your riding style and preferences, along with the proper seat post diameter, to ensure a comfortable and enjoyable biking experience.
Consider your riding style and preferences
Before you start searching for a new bike seat, it’s important to consider your riding style and preferences. Think about the type of cycling you do the most. Are you an avid road cyclist who spends hours on the saddle? Or perhaps you enjoy off-road adventures on your mountain bike?
Knowing your riding style will help you narrow down the type of seat that suits you best. If you’re into road cycling, you may prefer a narrow and sleek seat that offers a more aerodynamic position. For mountain bikers, a wider, more cushioned seat that provides extra support and shock absorption may be your preferred choice.
Measure the seat post diameter
Once you have an idea of what type of seat you’re looking for, the next step is to measure the seat post diameter. This measurement is crucial as it ensures a proper fit between the seat and your bike frame.
To measure the seat post diameter, you’ll need a caliper or a measuring tape. Simply remove the old seat if you haven’t already, and measure the outer diameter of the seat post. The most common seat post diameters are 27.2mm and 31.6mm, but other sizes do exist, so it’s important to double-check your specific bike’s requirements.
Once you have the correct seat post diameter, you can now confidently browse for seats that match your criteria and ensure a perfect fit on your bike.
Remember, the right seat replacement can significantly enhance your cycling experience, providing the comfort and support you need to ride longer and more comfortably. So take the time to choose wisely, considering your riding style and preferences, and measure your seat post diameter accurately. With the right seat replacement, you’ll be back on the road or trail in no time, ready to enjoy the thrill of biking to the fullest!
Install The New Bike Seat
Apply lubricant to the seat post
To begin installing your new bike seat, it’s crucial to apply lubricant to the seat post. Lubrication ensures a smooth and hassle-free insertion of the seat and prevents it from getting stuck or causing damage in the future. Here’s how you can do it:- Start by wiping clean the seat post and removing any dirt or debris.
- Apply a thin layer of lubricant to the seat post. You can use bike-specific lubricants or even common household lubricants like WD-40 or a light grease.
- Spread the lubricant evenly, making sure to cover the entire surface of the seat post.
Insert the new seat into the seat post
Now that you’ve applied lubricant to the seat post, it’s time to insert the new seat. Follow these steps to ensure a secure and proper fit:- Position the new seat above the seat post, aligning the seat rails with the grooves on the seat post.
- Gently push the seat down, applying even pressure, until it reaches the desired height. Ensure that the seat is straight and properly aligned before proceeding to the next step.
- If needed, adjust the seat position forward or backward to find a comfortable riding position. This can be done by loosening the seat clamp and sliding the seat along the rails.
- Once you have positioned the seat correctly, tighten the seat clamp securely. Use a wrench or an Allen key to fasten the clamp bolt, ensuring it is tightened to the manufacturer’s recommended torque specifications.
- Double-check the seat’s stability by giving it a gentle tug, making sure it does not move or shift.
Adjust The Seat Position
Adjusting the seat position is a crucial step in ensuring a comfortable and efficient ride on your bike. By setting the seat height, angling the seat for optimum comfort, and aligning the seat fore-and-aft position to your riding style, you can achieve the perfect fit.
Set the seat height
Begin by setting the seat height to the proper level. This will not only promote comfort but also enable you to generate power more efficiently. To find the right seat height, stand beside your bike and adjust the seat until it aligns with your hip bone. Once set, ensure the seat is secured tightly so that it doesn’t slip when you’re riding.
Angle the seat for optimum comfort
The next step is to angle the seat for optimum comfort. While personal preferences may vary, a general rule of thumb is to position the seat parallel to the ground. Adjust the seat angle to ensure that it supports your sit bones while maintaining a comfortable position for your pelvis. This balance will help alleviate any unnecessary pressure and enhance your overall riding experience.
Align the seat fore-and-aft position to your riding style
Aligning the seat fore-and-aft position to your riding style is essential for maximizing your performance on the bike. If you engage in more aggressive and aerodynamic riding, you may want to position the seat slightly forward. This forward position allows for better power transfer and efficiency. On the other hand, a more relaxed riding style may require a slightly more rearward position to provide additional stability and balance. Experiment with different positions to find the sweet spot that complements your riding style.
By adjusting the seat position, you can ensure a more comfortable and enjoyable ride. Remember to regularly check and readjust the seat position as needed, as your body and riding style may evolve over time. So get out there, make the necessary adjustments, and experience the difference that a properly positioned bike seat can make!
Take A Short Ride To Test The Seat Comfort And Position
Once you have installed your new bike seat, the next step is to take a short ride to test its comfort and position. This is an important part of the process as it allows you to make any necessary adjustments to ensure a comfortable and ergonomic riding experience.
Make minor adjustments if necessary
During your test ride, pay close attention to how the seat feels. If you experience any discomfort or pain, it may indicate that some minor adjustments are needed.
Here are a few things you can consider:
- Height: Is the seat positioned at the right height for your legs? When your pedal is at the lowest point, your leg should be almost fully extended, with a slight bend in your knee. Adjust the seat height accordingly.
- Angle: Is the seat angled correctly? A slight forward tilt can relieve pressure on your lower back, while a level seat can be more comfortable for some riders. Experiment with small adjustments until you find the angle that feels best for you.
- Fore and aft position: Is the seat positioned in the right spot horizontally? A good starting point is to align the front of the seat with the middle of your kneecap when the pedal is in the forward position. From there, you can make small adjustments based on your comfort preference.
Repeat the test ride until comfortable
After making any necessary adjustments, take another short ride to see if the changes have improved your comfort. It might take a few tries to find the perfect seat position, so don’t be discouraged if you don’t get it right on the first attempt.
Keep repeating the test ride and making adjustments until you find a position that feels comfortable and supportive for your body. Remember, everyone is different, so what works for others may not work for you.
By taking the time to properly test and adjust your bike seat, you can ensure a more enjoyable and pain-free riding experience. Don’t rush the process and listen to your body’s feedback – it will help you find the perfect seat setup!
Proper Bike Seat Maintenance For Longevity
The bike seat is a critical component of your bicycle that directly affects your comfort and performance during rides. With proper care and maintenance, you can extend the lifespan of your bike seat, ensuring many miles of enjoyable cycling ahead. In this article, we will explore two important aspects of bike seat maintenance: cleaning and protecting the seat, and regularly checking and tightening the seat clamp.
Cleaning and protecting the seat
Regular cleaning is essential to keep your bike seat in good condition and prevent the buildup of dirt, grime, and sweat. Here’s a simple step-by-step guide to cleaning your bike seat:
- Start by wiping the seat with a damp cloth to remove any loose dirt or debris.
- Next, mix a mild detergent with water to create a solution suitable for cleaning the seat.
- Gently scrub the seat using a soft brush or sponge, paying extra attention to any stubborn stains or marks.
- Rinse the seat thoroughly with clean water, ensuring all traces of detergent are removed.
- Pat the seat dry with a clean towel and leave it in a well-ventilated area to air-dry completely.
Protecting your bike seat from the elements is equally important. Exposure to sunlight and rain can cause the seat material to deteriorate over time. Consider using a seat cover or storing your bike indoors when not in use to shield it from harsh weather conditions. Additionally, using UV-resistant sprays or treatments specifically made for bike seats can help prolong their lifespan.
Regularly checking and tightening the seat clamp
The seat clamp is responsible for securing the bike seat onto the seat post, and it is crucial to regularly check and tighten it to ensure a safe and comfortable riding experience. Follow these steps to maintain the seat clamp:
- First, ensure that your bike is securely leaned against a stable surface or mounted on a bike repair stand.
- Locate the seat clamp beneath the seat post, usually held in place by bolts.
- Using an appropriate wrench or Allen key, carefully tighten the seat clamp bolts until they are snug, ensuring the seat remains level and secure.
- Check the seat for any movement or wobbling, and if necessary, tighten the bolts a bit more.
- Once you have tightened the seat clamp, test the seat by applying some force to check its stability.
Regularly checking and tightening the seat clamp not only prevents accidents but also maintains optimal saddle position, preventing discomfort during rides. By following these simple maintenance steps, you can ensure a longer lifespan for your bike seat, keeping you comfortable and confident on each cycling adventure.
Seek Professional Help If Needed
Complicated seat installations
Some bike seats are more complex to install than others, requiring specialized tools or advanced technical knowledge. If you find yourself facing a complicated seat installation, it may be best to seek professional help. Attempting to install a seat without the necessary expertise can lead to improper positioning, instability, or damage to your bike. Avoid any unnecessary risks and reach out to a bike shop or a professional bike mechanic who can ensure your new seat is installed correctly.
Customized fittings
In certain cases, you may require a customized fitting for your bike seat. This is common for cyclists who experience discomfort or pain while riding. A professional bike fitter will analyze your riding style, body measurements, and specific needs to recommend the optimal seat and position for you. If you suspect you need a customized fitting to achieve the perfect bike seat setup, it is wise to consult a professional fitter rather than attempting to make adjustments yourself.
Frequently Asked Questions For How To Change A Bike Seat
Can You Change Out Bike Seats?
Yes, you can change bike seats easily.
How Do You Change A Seatpost?
To change a seatpost, follow these steps: 1. Loosen the seat clamp bolt. 2. Slide the old seatpost out of the frame. 3. Insert the new seatpost into the frame. 4. Align the seat angle and height as desired. 5. Tighten the seat clamp bolt securely.
How Do You Set The Correct Bike Seat Height?
To set the correct bike seat height, follow these steps: 1. Stand next to your bike and ensure that the seat is at hip height. 2. Adjust the seat up or down until your leg is almost fully extended with a slight bend at the knee when the pedal is at the lowest point.
3. Securely tighten the seat clamp to avoid any movement. 4. Test ride the bike and make further adjustments if needed.
Conclusion
Changing a bike seat is a straightforward process that can greatly enhance your comfort and riding experience. By following the step-by-step instructions outlined in this blog post, you can easily replace your old seat with a new one. Remember to choose a seat that fits your body and riding style, and don’t hesitate to seek professional help if needed.
With a comfortable seat, you’ll be able to enjoy your rides to the fullest. Happy cycling!